Session 01 Introduction to Helm
Helm is the package manager for Kubernetes, designed to simplify deployment, configuration, and lifecycle management of Kubernetes applications using reusable packages called charts.
🧰 Helm Is Like APT/YUM for Kubernetes
| Platform | Install Method | Example |
|---|---|---|
| Linux | apt install nginx | Installs NGINX on system |
| Kubernetes | helm install nginx | Installs NGINX in cluster |
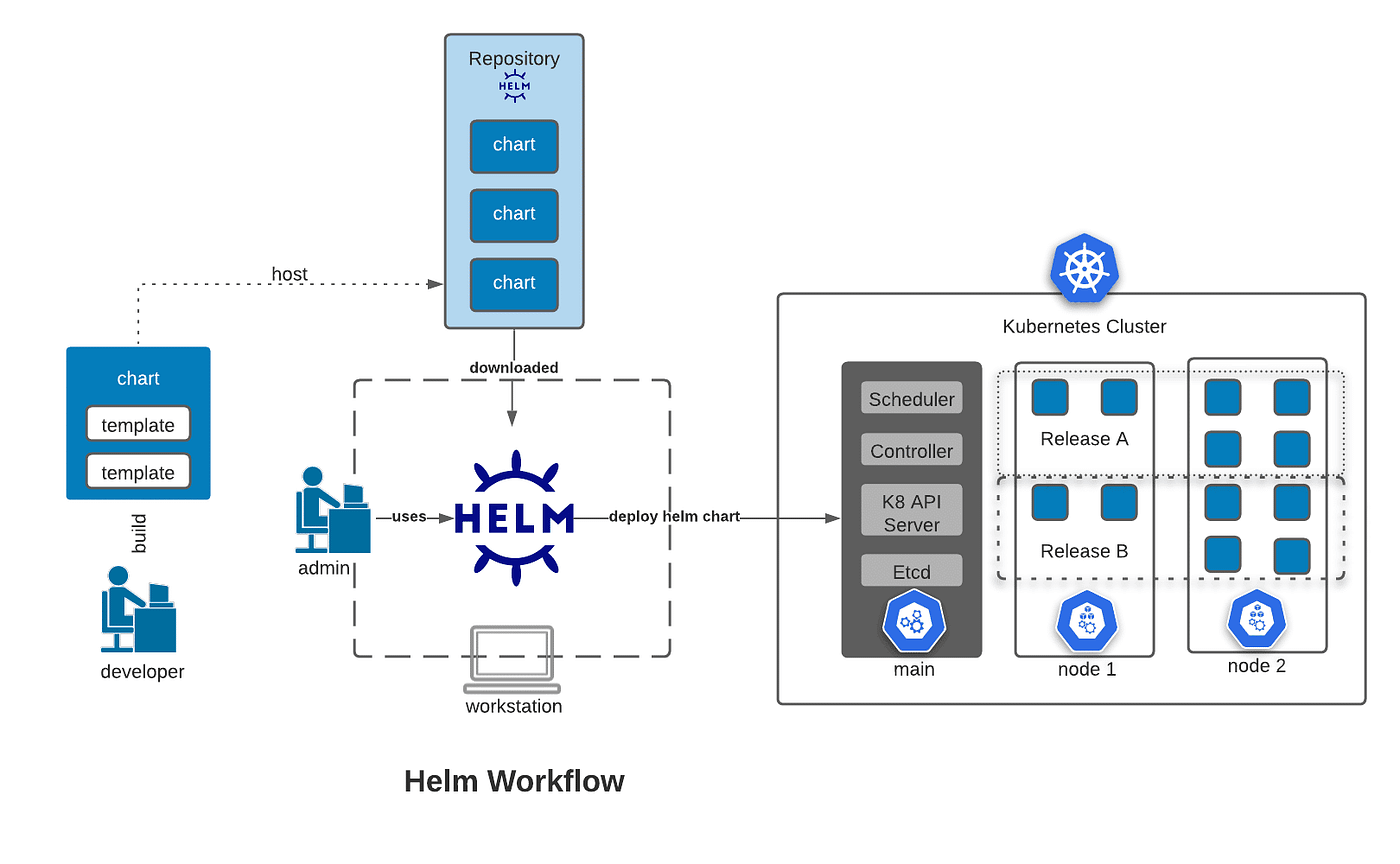
Helm Architecture
Overview
Helm 3 architecture is simple because the Tiller component used in Helm 2 has been removed.
Helm primarily consists of:
- Helm CLI
- Helm Charts
- Releases
- Kubernetes API Server
- Helm Repositories
1. Helm CLI
The Helm CLI is the command line interface used by developers and DevOps engineers to interact with Helm.
Example commands:
helm repo add bitnami https://charts.bitnami.com/bitnami
helm repo update
helm install my-nginx bitnami/nginx
helm upgrade my-nginx bitnami/nginx
helm uninstall my-nginx
Responsibilities:
- Installing applications
- Upgrading applications
- Rolling back releases
- Packaging charts
- Managing repositories
2. Helm Charts
A Helm Chart is a package that contains Kubernetes manifests required to run an application.
Typical Helm chart structure:
mychart/
 ├── Chart.yaml
 ├── values.yaml
 ├── templates/
 │    ├── deployment.yaml
 │    ├── service.yaml
 │    └── ingress.yaml
 └── charts/
Important files:
  File          Description
  ------------- -------------------------------
  Chart.yaml    Metadata about the chart
  values.yaml   Default configuration values
  templates/    Kubernetes manifest templates
3. Releases
A Release is a deployed instance of a Helm chart in a Kubernetes cluster.
Example:
helm install my-nginx bitnami/nginxHere:
- Chart → nginx
- Release name → my-nginx
Multiple releases can be created from the same chart.
helm install dev-nginx bitnami/nginx
helm install prod-nginx bitnami/nginx
Helm tracks:
- Configuration
- Version history
- Upgrade records
4. Kubernetes API Server
Helm interacts directly with the Kubernetes API server.
Workflow:
- User runs a Helm command
- Helm renders chart templates
- Kubernetes manifests are generated
- Helm sends manifests to Kubernetes API
- Kubernetes creates cluster resources
Resources created include:
- Pods
- Services
- Deployments
- ConfigMaps
- Secrets
5. Helm Repositories
Helm repositories store Helm charts.
Example repository:
https://charts.bitnami.com/bitnami
Add repository:
helm repo add bitnami https://charts.bitnami.com/bitnami
helm repo update
Search charts:
helm search repo nginxHelm Architecture Workflow
User
  │
  │ helm install
  ▼
Helm CLI
  │
  │ renders templates
  ▼
Helm Chart
  │
  │ Kubernetes manifests generated
  ▼
Kubernetes API Server
  │
  ▼
Cluster Resources
(Pods, Services, Deployments)
Helm 2 vs Helm 3
| Feature | Helm 2 | Helm 3 |
|---|---|---|
| Server component | Tiller | Removed |
| Security | Less secure | Improved |
| Communication | CLI → Tiller → Kubernetes | CLI → Kubernetes API |
| Complexity | Higher | Simpler |
Helm 3 is more secure and easier to manage.
Note As of 2026, Helm 4 has not yet been officially released as a stable production version.
Most production environments still use Helm 3. Helm 4 is currently under development and is expected to introduce improvements in performance, security, and overall maintainability.
Advantages of Helm
- Simplifies Kubernetes application deployment
- Supports reusable templates
- Enables easy upgrades
- Supports rollbacks
- Integrates well with CI/CD pipelines
⚙️ Prerequisites
Before using Helm, ensure the following:
- ✅ A working Kubernetes cluster
- ✅
kubectlconfigured to access the cluster - ✅ Helm CLI installed on your local system
🔧 Install Helm
curl https://raw.githubusercontent.com/helm/helm/main/scripts/get-helm-3 | bash🧩 Verify Helm Installation
helm version🌐 How Helm Connects to Kubernetes
Helm does not need a server component (like Tiller in v2). It uses:
- Your existing
kubeconfigfile (~/.kube/config) - Communicates directly with Kubernetes API server
- Uses standard Kubernetes resources:
Deployments,Services,Secrets, etc. - Releases are tracked in your cluster (by default stored as Kubernetes Secrets)
In essence, Helm is just another Kubernetes client, like
kubectl, but focused on packages.
🚀 Getting Started: Using Existing Helm Charts
The fastest way to start with Helm is by installing applications using public charts.
1️⃣ Add a Chart Repository
helm repo add bitnami https://charts.bitnami.com/bitnami2️⃣ Update the Repository Cache
helm repo update3️⃣ Search for a Chart
helm search repo nginxSearch without adding a repo
helm search hub nginxHelm searches Artifact Hub, which is the central public registry for Helm charts and other cloud-native packages.
4️⃣ Install a Chart
helm install my-nginx bitnami/nginxThis command installs the nginx chart from the Bitnami repo as a release named my-nginx.
5️⃣ Verify the Installation
helm list
kubectl get all
📦 Helm Chart Anatomy
A Helm chart is a structured directory containing:
mychart/
├── Chart.yaml        # Chart metadata
├── values.yaml       # Default config values
├── templates/        # Kubernetes YAML templates
├── charts/           # Subcharts (optional)
└── README.md         # Documentation (optional)
🛠️ Create a Chart
helm create myapp🚢 Helm Repositories
Helm repositories host charts and can be added easily:
helm repo add bitnami https://charts.bitnami.com/bitnami
helm repo update
helm repo list
🚀 Helm Releases
A release is a deployed instance of a chart.
Common Release Commands:
# Install
helm install my-nginx bitnami/nginx

# List
helm list

# Upgrade
helm upgrade my-nginx bitnami/nginx

# Roll back
helm rollback my-nginx 1

# Uninstall
helm uninstall my-nginx
🔧 Customizing Installations
Using --set (inline):
helm install my-nginx bitnami/nginx \
  --set service.type=NodePort \
  --set replicaCount=2
Using --values (file):
helm install my-nginx bitnami/nginx -f custom-values.yamlCombine both:
helm install my-nginx bitnami/nginx \
  -f base.yaml \
  --set service.type=LoadBalancer
🔍 Preview and Debug Charts
Preview manifests without installing:
helm template my-nginx bitnami/nginxDry-run install:
helm install my-nginx bitnami/nginx --dry-run --debug📥 Get and Customize Chart Values
Show default values:
helm show values bitnami/nginxSave for customization:
helm show values bitnami/nginx > custom-values.yamlThen install with:
helm install my-nginx bitnami/nginx -f custom-values.yaml📄 Get Values from a Running Release
helm get values my-nginx -n default --all🧰 Common Helm CLI Reference
# Add repo
helm repo add <name> <url>

# Update repos
helm repo update

# Search
helm search repo <keyword>

# Install
helm install <release-name> <chart>

# Upgrade
helm upgrade <release-name> <chart>

# Rollback
helm rollback <release-name> <revision>

# Uninstall
helm uninstall <release-name>

# Get installed values
helm get values <release-name> -n <namespace> --all

# Show default values
helm show values <chart-name>
✅ Summary
- Helm simplifies app deployment on Kubernetes via reusable charts.
- Works with your kubeconfig—no need for server-side components.
- Helm v3 is modern, secure, and CI/CD-friendly.
- Start by using existing charts, then build and customize your own.